 Save to Pinterest
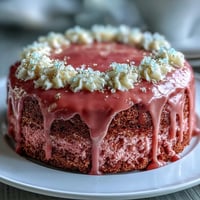
 The first time I made Rosé Velvet Cake, the air in my kitchen was filled with a delicate floral-fruity aroma that had me smiling even before I cut the first slice. I'd been tasked with creating something show-stopping for my friend's bridal shower, and after much debating over flavor and flair, this cake started to take shape between sips of actual rosé and fits of laughter. My apron ended up way more blush than white, but it felt right—this cake is meant for celebrations that brim with anticipation and a little mischief. The gently pink crumb and glistening gold drip got as many gasps as the proposal story, and no one could resist asking for seconds. From the subtle notes of wine to the creamy swoops of frosting, it felt like a dessert spun just for those rare days you want to remember forever.
Baking this cake for my sister’s pre-wedding brunch meant dodging a parade of hands reaching for tasting spoons and frosting swipes. Watching her friends crowd around the kitchen counter debating whether the gold was real edible gold or just pure magic still makes me laugh. The energy in the room was chaotic and sweet, the kind of afternoon when conversations blur and everyone feels a bit brighter. Cake slices vanished before the last teacups were filled. I half-expected to find a trail of gold glitter leading out the door by the end.
Ingredients
- All-purpose flour: Use a gentle hand when sifting—it keeps the cake crumb light and velvety.
- Granulated sugar: Cream with butter until almost white for extra fluffiness in the cake base.
- Baking soda and baking powder: Vital for lift—double check your leaveners aren’t past their prime.
- Salt: Just a pinch sharpens both the sweetness and rosé notes.
- Unsweetened cocoa powder: Adds earthiness and depth to the blush cake color.
- Unsalted butter: Let it fully soften for smooth mixing—cold butter leads to lumpy batter.
- Buttermilk: The tang keeps the cake tender, so don’t substitute regular milk if you can help it.
- Rosé wine: Choose a dry rosé you enjoy drinking—its flavor lingers in the cake and frosting.
- Eggs: Room temperature eggs blend in better and help create an airy finish.
- Vanilla extract: Boosts the floral notes and pulls all the flavors together.
- White vinegar: A small but crucial step for keeping the crumb soft and plush.
- Pink food coloring gel: Use sparingly and in layers—the color intensifies as you mix.
- Cream cheese: For luxurious, tangy frosting that balances the cake’s sweetness.
- Powdered sugar: Always sifted for a frosting as smooth as silk.
- Heavy cream: Gives the white chocolate drip its perfect pourable texture.
- White chocolate chips: Melt gently for a glossy drip—be patient and stir between microwave bursts.
- Edible gold luster dust: A little goes a long way—build up color gradually with a soft brush.
- Vodka or clear extract: Evaporates quickly so you’re left with a glimmering gold finish.
Tired of Takeout? 🥡
Get 10 meals you can make faster than delivery arrives. Seriously.
One email. No spam. Unsubscribe anytime.
Instructions
- Prep the pans and oven:
- Let’s start by preheating the oven to 350°F and lining every cake pan base with parchment—fewer panics when turning out those gorgeous layers later.
- Sift and combine dry ingredients:
- Inhale the cocoa while sifting; mix flour, cocoa, leaveners, and salt till uniform—your hands will thank you for the soft, airy powder.
- Cream butter and sugar:
- Beat until pale and billowy, scraping down the bowl to make sure every bit is light and fluffy.
- Incorporate eggs and vanilla:
- Crack in eggs one at a time, pausing just long enough to admire how glossy it looks before adding vanilla.
- Add buttermilk, rosé, and vinegar:
- With the mixer on low, pour them in slowly; the mixture may look a little odd but it’ll come together beautifully.
- Blend in dry mixture and color:
- Add dry ingredients in batches, mixing gently, then add pink gel little by little for that perfect blush.
- Divide and bake:
- Pour batter into pans and smooth the tops; bake until a toothpick comes out dry and your kitchen smells like heaven.
- Cool the cakes:
- Rest layers in pans 10 minutes, then turn onto racks—the hardest part is not sneaking a warm crumb.
- Make the rosé cream cheese frosting:
- Whip butter and cream cheese until cloud-like, add sugar slowly, then rosé and vanilla—watch it fluff up temptingly.
- Layer and frost the cake:
- Level your cakes if needed and stack them high, spreading frosting with an offset spatula; chill before the final coat for a cleaner look.
- Create the gold drip:
- Melt chocolate with cream carefully and cool a bit; then, using a spoon or bottle, let it slowly drip over the cooled cake’s edge.
- Paint the drip gold:
- Mix luster dust with vodka, then delicately brush gold onto each drip for instant elegance.
- Chill and serve:
- Let the cake firm up in the fridge for half an hour—this makes slicing perfect wedges for every guest a breeze.
 Save to Pinterest
 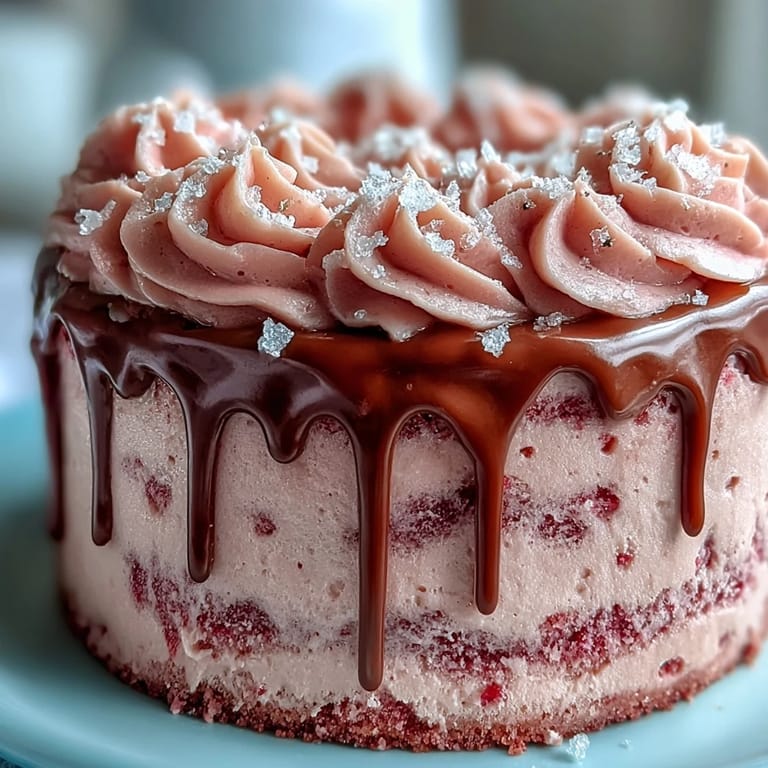 Save to Pinterest
 When I brought this cake to a friend’s engagement party, the way the bride’s eyes lit up made hours of piping and drip-painting so worthwhile. There was a hush as the first slice was revealed: soft pink crumb, creamy layers, and a shining gold crown—a reminder that food can turn an ordinary gathering into something unforgettable.
Mastering the Gold Drip Effect
For the most dazzling gold drip, let your white chocolate cool just enough so it doesn’t run too fast—aim for honey-like consistency. I learned to start the drips at the back of the cake so I could practice where no one would see any messy first tries. Working in small spoonfuls gives you more control over length and pattern. The gold really pops when you use a soft brush and apply several light coats, letting each dry for a minute. If you accidentally smudge some gold, it’s easy to scrape and redo without leaving a trace.
Ways to Decorate for the Occasion
Edible flowers, scattered gold leaf, or a scattering of fresh berries all elevate this cake to centerpiece status. I once went wild with micro roses and tiny champagne grapes and the result looked almost too beautiful to eat. Alternating pink and white rosettes from leftover frosting gives a romantic, layered look that’s perfect for wedding-themed parties. Keep decorations to a few focal points so the gold drip remains the star. Plan ahead for your cake’s big reveal—guests love that Instagram moment.
Make-Ahead and Storage Wisdom
Assembling the cake a day in advance lets the flavors deepen, and a cold cake is much easier to slice cleanly when company arrives. Frosting can be made and stored in the fridge up to two days ahead—just give it a good whip before using so it’s ultra smooth. Leftover cake (rare as it is) stays moist and luscious for two days in an airtight container.
- Always allow cake layers to cool fully or you’ll battle sliding frosting.
- Touch up the gold paint after refrigeration to refresh its shine for serving.
- Serve the cake slightly chilled for the best texture and easy slicing.
 Save to Pinterest
  Save to Pinterest
 I hope this Rosé Velvet Cake brings as much sparkle and joy to your occasion as it has to mine. Here’s to celebrating love—one golden slice at a time.
Recipe FAQs
- → How do I get a consistent blush color?
Add pink gel coloring a little at a time, mixing thoroughly between additions. Use gel rather than liquid for a more vibrant hue without thinning the batter.
- → Can I omit the alcohol?
Yes. Substitute rosé with an equal amount of sparkling grape juice or a nonalcoholic rosé alternative; brush layers lightly to retain moisture and flavor.
- → How do I achieve a smooth crumb coat?
Level the layers, stack with a thin frosting layer between each, then apply a very thin outer coat of frosting. Chill 30 minutes to set before finishing with the final layer.
- → What’s the best way to make a stable gold drip?
Melt white chocolate with a little warmed cream to a pourable thickness, cool to room temperature, then drip. Mix edible gold luster dust with clear alcohol or extract and paint once the drip has set.
- → How should I store the finished cake?
Refrigerate covered for up to 3 days. Bring to room temperature about 30–60 minutes before serving for optimal texture and flavor.
- → Any tips for even baking?
Fill pans evenly, rotate halfway through baking if your oven runs hot, and test with a toothpick. Cool in pans 10 minutes before transferring to racks to finish cooling.